

How To Start Fermenting Food At Home: A Simple Guide
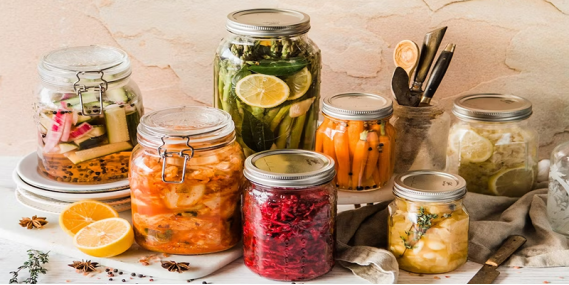
Fermenting at home is a simple, time-honoured process that uses beneficial microbes, like bacteria and yeast, to transform food. This method naturally preserves food, enhances its flavour, and boosts its nutritional value. If you've ever enjoyed yoghurt, sourdough bread, or sauerkraut, you've experienced the magic of fermentation. This guide will walk you through everything you need to know—from the basics to easy fermentation recipes for beginners—so you have the confidence to get started today.
For over 20 years, I've been teaching people how to bring this ancient craft into their modern kitchens. It's not complicated or scary, I promise. We'll demystify the process, explore the essential equipment you likely already own, and tackle common questions about safety and troubleshooting. My goal is to make this guide the only one you'll ever need to start your fermentation journey.
Getting Started: The Why and What of Fermentation
Before we chop a single vegetable, let's understand the fundamentals. Knowing the "why" behind the process makes the "how" so much easier and more intuitive. Think of this as meeting the tiny chefs who will be doing all the work for you.
What Exactly Is Fermentation?
At its core, fermentation is a metabolic process. Tiny microorganisms (bacteria, yeast) consume sugars and starches in food and convert them into other compounds, like lactic acid, alcohol, and carbon dioxide. In the context of home food fermentation, we are primarily focused on creating an environment that encourages the "good guys" (like Lactobacillus bacteria) to thrive while inhibiting the "bad guys" that cause spoilage.
When you make sauerkraut, for example, Lactobacillus bacteria on the cabbage consume the cabbage's natural sugars and produce lactic acid. This acid gives sauerkraut its tangy flavour and, more importantly, acts as a natural preservative, keeping harmful microbes at bay.
Why Should I Ferment Food At Home? The Amazing Benefits.
Fermenting isn't just a fun kitchen project; it's a powerful way to improve your diet and reduce food waste. After years of fermenting everything from hot sauce to pickles, I've found the benefits are truly transformative.
- Probiotic Power: Fermented foods are rich in probiotics, which are beneficial bacteria that support a healthy gut microbiome. A healthy gut is linked to better digestion, a stronger immune system, and even improved mental health.
- Enhanced Flavour: Fermentation creates complex, deep, and tangy (umami) flavours that you can't get any other way. It turns a simple carrot into a zesty, irresistible snack.
- Increased Nutritional Value: The fermentation process can increase levels of specific vitamins, such as B vitamins, and make minerals in food more bioavailable, so your body can absorb them more easily.
- Natural Preservation: This is the original purpose of fermentation! It's a way to preserve the harvest long before refrigerators existed. A jar of sauerkraut can last for months.
- Reduced Food Waste: Have some vegetables in the crisper drawer that are about to go bad? Fermenting them is a perfect way to give them a delicious new life.
Is Fermenting At Home Safe?
This is the number one question I get, and the answer is a resounding YES, it is extremely safe when you follow a few basic principles. The process creates its own safety net. By creating a salty, anaerobic (oxygen-free) environment, you are making the perfect home for beneficial lactic acid bacteria, which, in turn, produce acid. This acidic environment prevents harmful pathogens such as Clostridium botulinum from surviving.
The golden rule is simple: keep it salty, and keep it submerged. As long as your vegetables stay below the surface of the brine, they are protected from oxygen-loving moulds and spoilage microbes.
Fermenting Vs. Pickling: What's The Difference?
People often use these terms interchangeably, but they are different. While both methods preserve food and give it a tangy taste, the process is distinct. Modern "quick pickling" involves using a pre-made acid, such as vinegar. Actual fermentation creates its own acid using live cultures.
Feature |
Fermenting |
Vinegar Pickling |
Preserving Agent |
Lactic acid, created by live bacteria |
Acetic acid (vinegar) |
Process |
Live, dynamic process over days/weeks |
Food is preserved in a hot or cold vinegar solution |
Health Benefit |
Rich in probiotics (live cultures) |
No probiotics; essentially cooked/sterilized |
Flavor Profile |
Complex, tangy, effervescent |
Sharp, acidic, singular vinegar taste |
Your Fermentation Toolkit: Essential Equipment and Ingredients
You might be surprised to learn that you don't need much fancy, expensive equipment to get started. You can get started with items you already have in your kitchen. The focus here is on function, not flash.
What Basic Equipment Do I Need To Start Fermenting?
Let's break it down into the absolute must-haves and some helpful "nice-to-haves" that can make the process a bit smoother.
- Must-Haves:
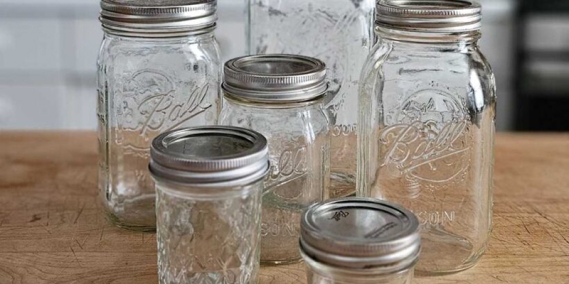
- A Glass Jar: A standard wide-mouth quart-sized (32 oz) Mason jar is the perfect starting point. Glass is nonreactive, allowing you to see the fermentation magic unfold.
- A Weight: You need something to hold the vegetables under the brine. This can be a smaller glass jar that fits inside the larger one, a clean rock, or a cabbage leaf folded on top.
- A Lid: You can use the standard metal lid that comes with the jar, just be sure to "burp" it daily by unscrewing it briefly to release pressure.
- Nice-to-Haves:
- Fermentation Weights: These are Glass or ceramic discs designed to fit perfectly inside a wide-mouth jar. They are a worthwhile investment if you get serious about the hobby.
- Airlock Lids: These special lids feature a one-way valve that lets carbon dioxide out but prevents oxygen from entering. This eliminates the need for daily burping and reduces the risk of surface mould.
- A Kitchen Scale: For consistent results, especially with your salt-to-water ratio, a digital kitchen scale is beneficial.
Choosing The Right Fermentation Vessel
While a Mason jar is a great start, there are other options. Here's a quick comparison to help you understand the landscape as you grow in your practice.
Vessel Type |
Pros |
Cons |
Best For |
Mason Jar |
Inexpensive, readily available, and easy to see progress. |
Needs burping or special airlock lid; smaller batches. |
Beginners, small batches of veggies, and hot sauce. |
Fido-Style Jar |
Built-in rubber gasket creates an excellent seal. |
It can be more expensive; some find the wire bail clumsy. |
Fermenting fruits, kvass, or anything very active. |
Ceramic Crock |
Traditional, great for large batches, blocks out light. |
Heavy, expensive, can't see the ferment. |
Making large volumes of sauerkraut or kimchi. |
The Magic Ingredients: Salt And Water
You can't ferment without salt and water, but the type you choose matters. Using the wrong kind is one of the most common beginner mistakes I see.
For salt, you must use a salt without additives. This means no iodized table salt. Iodine can inhibit the beneficial bacteria we're trying to cultivate. Likewise, anti-caking agents found in some salts can make your brine cloudy. Look for:
For water, you need chlorine-free water. Chlorine is added to municipal tap water to kill bacteria—precisely what we don't want. It will harm your ferment. If you have tap water, you can easily dechlorinate it by simply letting it sit out on the counter in an open container for 24 hours, or by boiling it for 10 minutes and letting it cool.
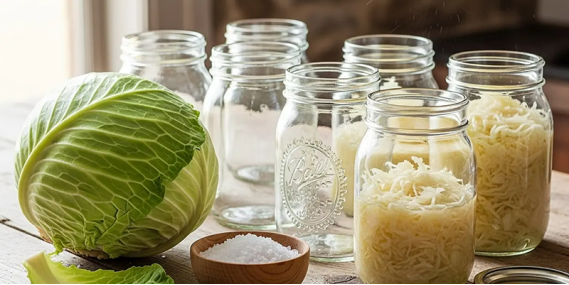
The Process Step-by-Step: Let's Make Your First Sauerkraut
Sauerkraut is the quintessential beginner's ferment. It requires just two ingredients—cabbage and salt—and it teaches you all the fundamental principles. Let's make a quart-sized jar together.
Step 1: Gather Your Ingredients And Tools
- 1 medium head of green cabbage (about 2 pounds)
- 1 to 1.5 tablespoons of non-iodized salt
- A 1-quart (32 oz) wide-mouth glass jar
- A large mixing bowl
- A kitchen scale (optional, but recommended)
Step 2: Shred And Salt Your Cabbage
Remove the outer, wilted leaves from the cabbage and set aside one clean, healthy leaf for later. Core the cabbage and slice it thinly. You can use a knife or a mandoline for this. Place all the shredded cabbage in your large mixing bowl.
Sprinkle the salt over the cabbage. Now, get your hands in there and start massaging! Squeeze, press, and mix the cabbage and salt for about 5-10 minutes. At first, it will feel dry, but soon the salt will begin to draw water from the cabbage, creating its own natural brine. You'll know it's ready when you can grab a handful and easily squeeze out a stream of liquid.
Step 3: Pack Your Jar
Grab handfuls of the cabbage and pack it into your jar, pressing down firmly with your fist or a wooden tamper after each addition. The goal is to remove all air pockets. Pour any remaining liquid from the bowl into the jar. When you're done, the cabbage should be completely submerged in its own brine. There should be at least an inch of liquid covering the cabbage.
Step 4: Weigh It Down And Seal It Up
To keep the cabbage submerged, fold the whole cabbage leaf you set aside earlier and place it on top of the shredded cabbage. This acts as a follower. Then, place your fermentation weight (or a small, clean jar) on top of the leaf to hold everything down. You want to see the brine rise above the weight.
Loosely screw on the lid or affix your airlock lid. Label the jar with the date.
Step 5: Ferment, Wait, And Taste
Place your jar on a small plate (to catch any potential overflow) in a cool, dark place, away from direct sunlight. A kitchen counter is fine. For the first few days, you'll see bubbles forming—this is fermentation in action! If you're using a standard lid, "burp" the jar once a day by quickly unscrewing and re-screwing the lid to release CO2 buildup.
Start tasting your sauerkraut after about 7 days. It will be tangy and delicious. If you prefer a more sour, complex flavour, let it go for 2-4 weeks or even longer. When it tastes good to you, it's ready! Remove the weight, secure the lid, and move it to the refrigerator. It will last for many months.
Troubleshooting Common Fermentation Issues
Even seasoned fermenters run into a few bumps. Don't panic! Most issues are easily fixable and part of the learning process. Here are the most common things you might encounter.
Help! Is This White Film On Top Of The Mould? (Kahm Yeast Vs. Mould)
This is a frequent cause for alarm. Most of the time, a white film on the surface of your brine is harmless Kahm yeast. It's not pretty, but it won't hurt you. Mould, on the other hand, is a sign to toss the batch. Here's how to tell them apart:
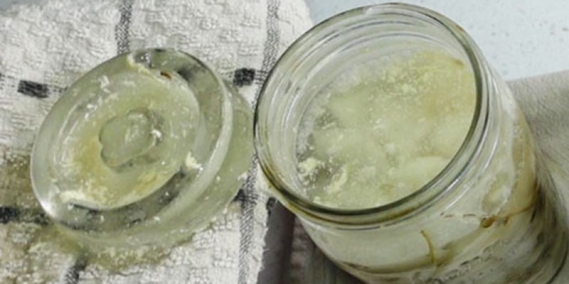
- Kahm Yeast: Looks like a thin, white, slightly wrinkly film. It's usually flat on the surface. If you see this, skim it off as best you can with a clean spoon. Your ferment is fine.
- Mould: Is fuzzy, hairy, and often appears in distinct circular patches of blue, green, black, or pink. If you see fuzzy mould, do not try to save it. The mould you see on the surface has likely sent unseen roots deep into your ferment. Compost it and start over, ensuring your veggies stay fully submerged next time.
My Ferment Smells Weird. Is It Bad?
Fermentation is a funky business. Expect some sour, earthy, and sometimes even sulfurous smells, especially with cabbage and radishes. This is normal. The Scent you need to worry about is a truly putrid, rotten, or foul odour that makes you recoil. Your nose is an excellent guide. If it smells unappetizingly rotten, trust your instincts and discard it.
Why Isn't My Ferment Bubbling?
Bubbles are a sign of active fermentation, but their absence doesn't always mean failure. Here are a few reasons why you might not see vigorous bubbling:
- It's too cold: Fermentation slows down in cooler temperatures. Try moving your jar to a slightly warmer spot.
- It's too early (or too late): The most vigorous bubbling often occurs in the first few days, then subsides.
- The seal isn't perfect: If you're using a standard lid, gas might be escaping slowly without you noticing. This is perfectly fine.
Conclusion
Fermenting at home is an advantageous skill that connects you to your food in a new way. It's a blend of science, art, and a little bit of patience. As we've seen, the process is incredibly safe, requires minimal equipment, and opens up a world of incredible flavours and health benefits. Start with a simple sauerkraut, trust the process, and don't be afraid to experiment. You're now equipped with the knowledge to begin your own delicious journey. Share this guide with a friend and start fermenting together!
6 Simple Meal Prep Recipes To Save Time And Eat Well

Classic Hearty Lentil and Sausage Soup (Easy Recipe)

Easy & Delicious Healthy Breakfast Bakes for Meal Prep

Easy & Healthy Soup Recipes You Can Make in Under 30 Mins
Cooking with Functional Foods: Recipes That Heal and Nourish
